
Imagine if you could simply tap a button and both the audio and the video loaded on your laptop or desktop could be sent to your large HDTV? Sure, Apple’s AirPlay has brought us partly there. In fact, just the other night I wanted to watch a movie I had rented on my iPad and decided to view it on my large Samsung TV instead. I started the movie on my iPad, tapped the AirPlay button and, within a few seconds, it was being streamed from my iPad to my Apple TV to my HDTV. It works seamlessly. The only problem is… AirPlay is currently limited in what can actually be streamed from one device to another.
That’s where the Veebeam has the potential to step in and fill a need. With the Veebeam you can stream anything that is on your computer (Mac or Windows) to any TV via the connected Veebeam set-top box. Do you really want or need another set-top box? Read on to find out.
From Veebeam:

Play Anything. Share Anything.
Veebeam is the easiest, most affordable way to wirelessly stream anything from your laptop to your TV.
It lets you combine the amazing video and audio performance of your current HDTV with the never-ending entertainment options available on your existing laptop.
It lets you share all your digital content with your family and friends.
Easy: When you’re ready to watch a movie, plug the USB antenna into your laptop and stream anything directly to your TV. It’s that simple.
Affordable: Starting at $99, Veebeam lets you make the most of your big HDTV and that new high capacity laptop…without breaking the bank.
Looks Great: Your digital media files will never look better than on your big HDTV. That’s because Veebeam outputs 1080p video.
Plays Anything: If your PC can play it, Veebeam can send it on your TV. From TV shows and movies from popular sites like Hulu, Netflix, YouTube to downloaded video and personal photos.
Secure wireless USB: Why use another wire to connect your TV and PC? Declutter your home, cut the cables, and simplify your life by going wireless.
What’s In The Box:
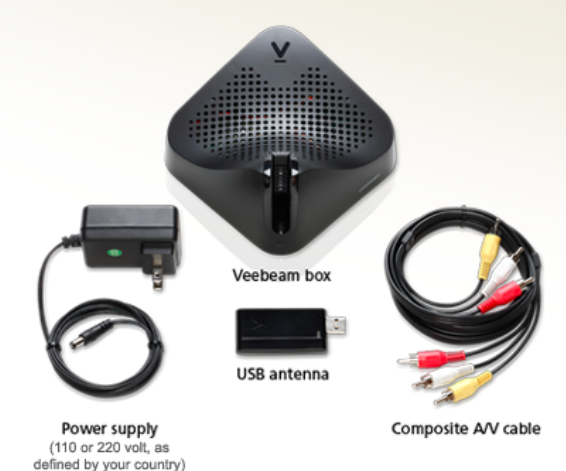
The unit comes with everything you need to get up and running in minutes. It does not, however, include an HDMI cable so if you plan to connect the unit over HDMI make sure you have one available.
Let’s take a walk around the unit.
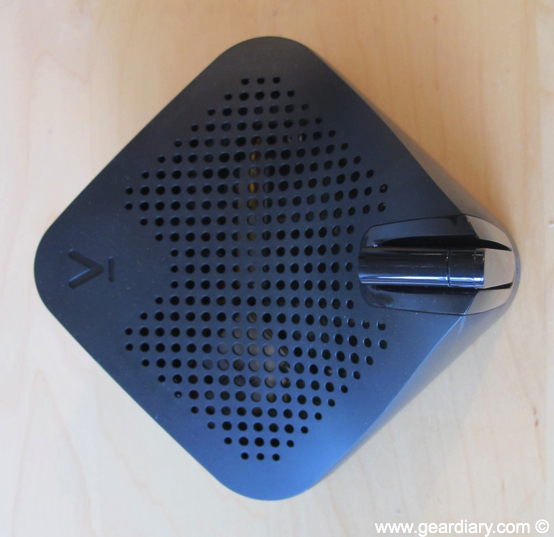
To say that the Veebeam has an unusual appearance would be an understatement. It comes in a simple black color but it has a look that is totally unique. Those who like industrial design and unusual gadgets will love it. Those who want the Veebeam to fit into a TV/Audio shelf system will be unhappy.
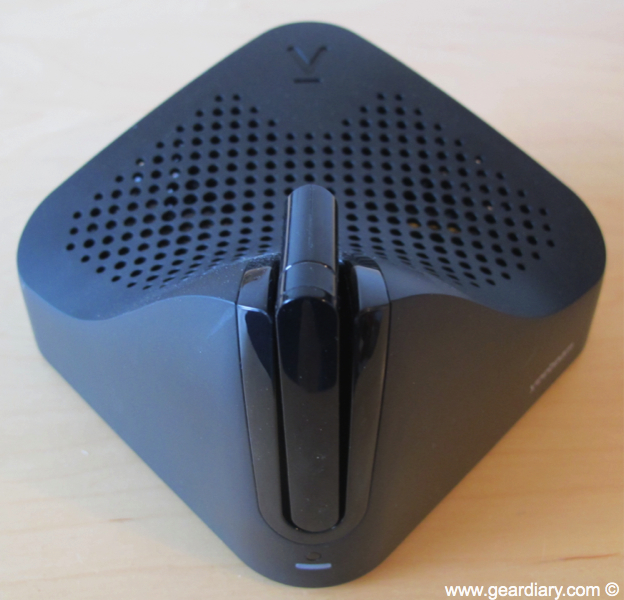
When looking at the unit from the front you see a mountain peak rising from the middle and making its apex in the form of the USB dongle.
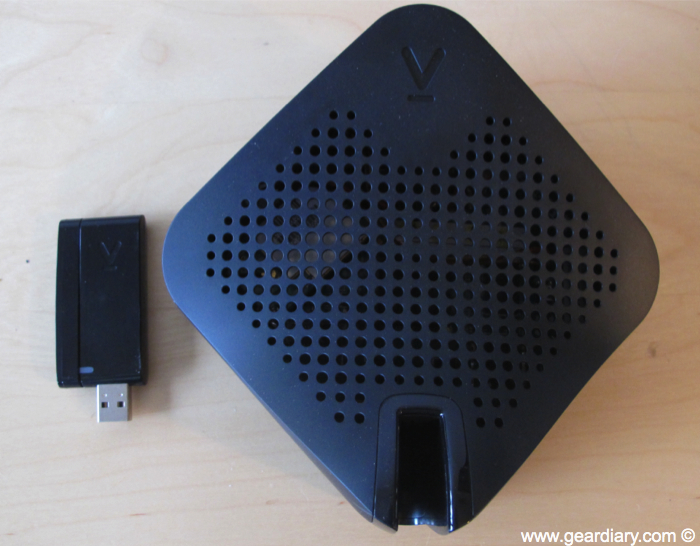
Here is the view from the top when the dongle is removed. Interestingly, it functions as the on/off switch for the Veebeam. Place it in the Veebeam and the system turns off. Remove the dongle and it is automatically turned on and ready for use.
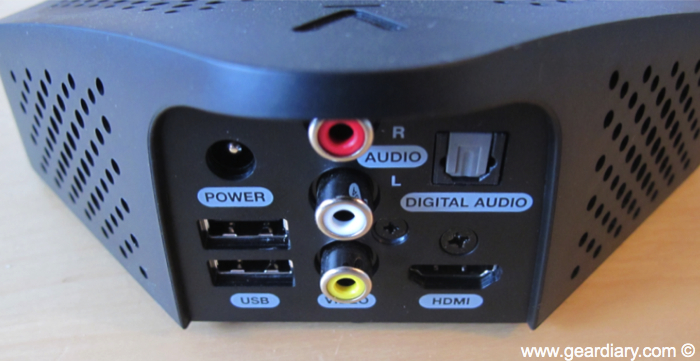
Here is the view from the back. As you can see all the connections are clearly marked.
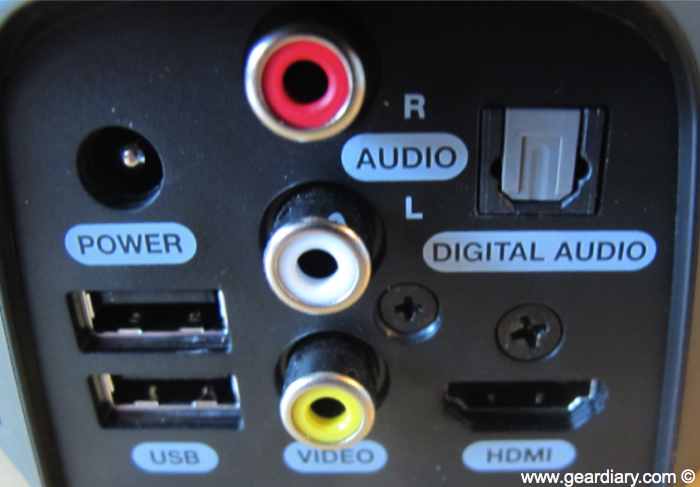
I was initially unclear as to the purpose of the USB ports. One important use became clear shortly after I started using the device. More on that shortly.
Setup and Initial Use:
The company’s description of how to get up and running with the Veebeam. This graphic from them explains the three steps. Simple right? Well yes… And no.
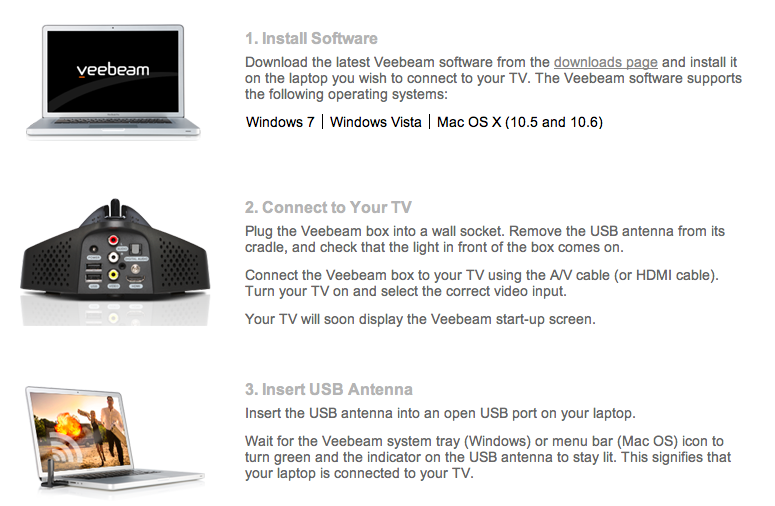
The first thing you need to do is load the Veebeam software on the computer you want to use. The downloads can be found HERE.

It is a small file and it should load quickly, or at least it did on my Mac.
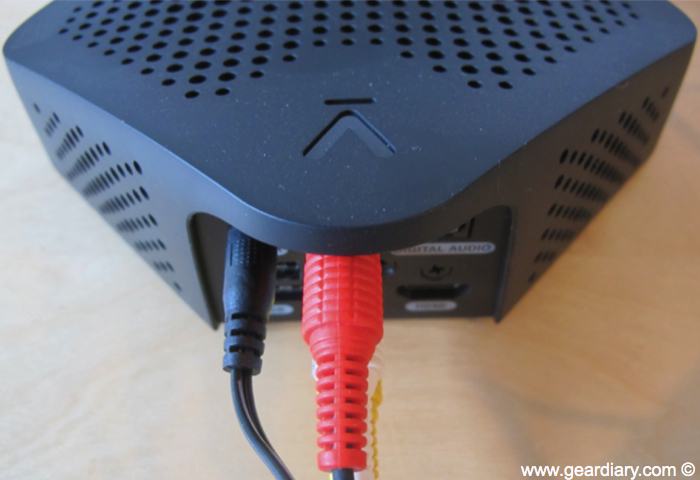
You then connect the Veebeam to the TV you want to use.
You can use an HDMI cable if you have one, but I used the included connections…
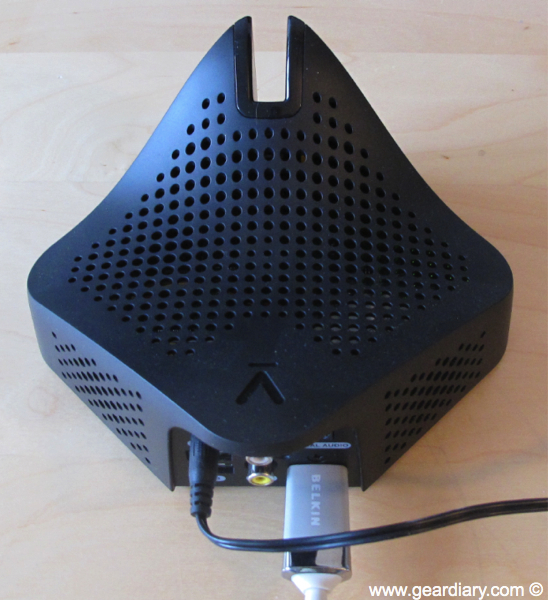
And this is the HDMI connection.
To say that setup is simple is an overstatement.
You then plug the USB dongle into the computer that is now running the software. If you are on a Mac a Veebeam icon will appear at the top of the screen.
At least that’s the way it is supposed to work.
Before we get into that lets look at what appears on the computer screen when the Veebeam dongle is connected.
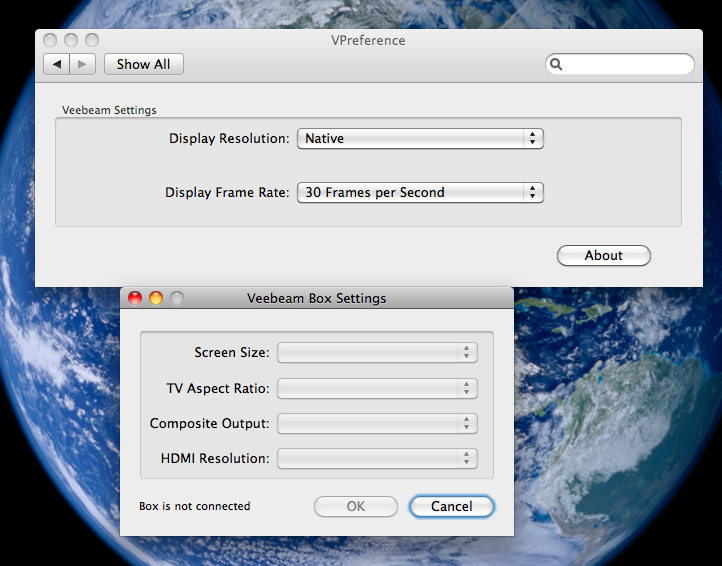
A small icon will appear at the top of the screen. Clicking on it gives you some choices which, in turn, give these configuration screens. There aren’t a lot of options here and that’s a good thing since this is a consumer device that is targeted at those who want plug-and-play functionality.
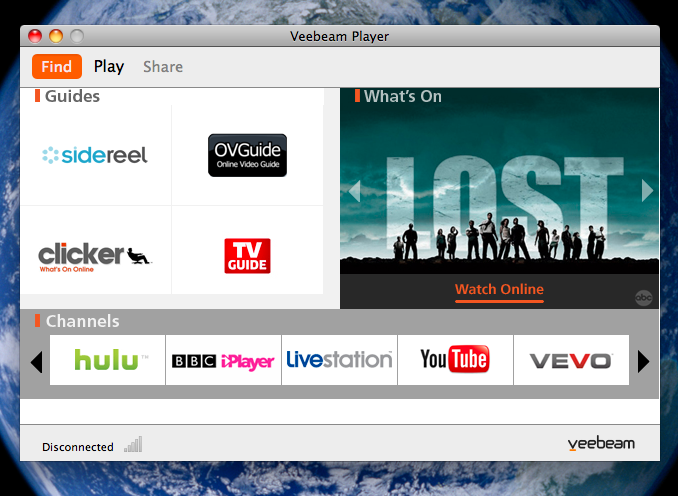
This handy screen gives shortcuts to a variety of services that stream media and might be of interest when using the Veebeam. It is a nice touch!
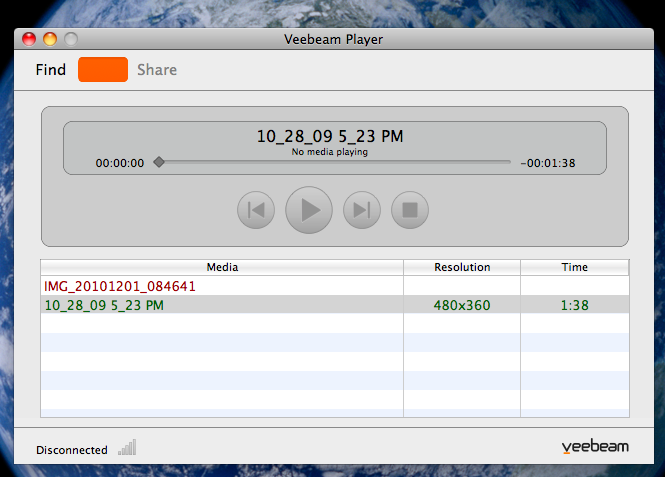
And the Veebeam player lets you throw your resident content up on the TV. Also a nice touch although you could use any media player and have the same result.
Modes:
When using the Veebeam it offers two modes. One lets you effectively throw the active screen of your computer on the TV while the other lets you stream from the computer while also doing activities not related to what is streaming on your computer, or said differently — multitasking. Here’s how the company explains the two modes:
There are two ways to use Veebeam: Screencasting mode and Video Play-To mode. Selecting between Screencasting and Video Play-To modes depends on what kind of content you want to watch on your TV.
Screencasting Mode (default): Use this mode to display your desktop or share websites with friends and family. This is the mode you will see when you first insert the USB antenna into your laptop.
Video Play-To Mode: Use this mode to enjoy the best video quality when playing downloaded media files (not applicable to websites). The other big advantage over Screencasting Mode is multi-tasking. When using Video Play-To Mode, you can stream to your TV while writing emails or surfing the web.
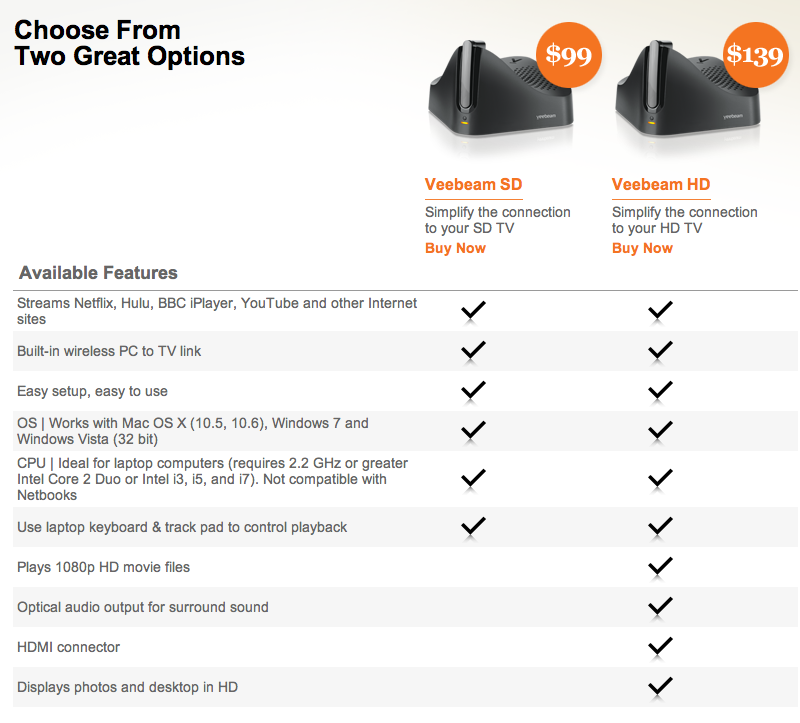
The unit comes in two varieties with a price difference of $40. For $99 you can get the Veebeam SD for connecting to a standard definition TV. For $139 you can get a Veebeam HD for connecting to a HD TV.
Here’s a comparison of the features offered by both.
And here is a video of it in action…
So what do I think of the unit? I think it has potential.
I love the idea of the setup box. To be able to plug a USB dongle into your computer and have the screen and the audio sent right to any TV is fantastic. The audio quality of video thrown on the TV is good but not great. The video quality is just fine. And the fact the voice and video were perfectly in sync was GREAT!
In all this is a huge step forward with regard to integrating the variety of electronics and media devices we have.
And yet I can’t recommend. Why? Simple, it’s not user-friendly enough for someone like my mother or my father in law. It promises to work seamlessly but that just wasn’t my experience with it. When it worked it worked well. As promised it sent my video and audio right to my TV. But that was when it worked. Time and again I had difficulty getting the signal from my computer to show up on the TV because the screen continually showed “Waiting for PC/TV connection”. Often times it would only connect when I placed the dongle back in the Veebeam set-top box, rebooted my computer and plugged the dongle back in. I will go through those backflips if need be… but my mother won’t.
Things were slightly better once I updated the firmware for the set-top box but that had its own frustrations for me and for the mainstream public would be a total fail. For something to be mainstream in the electronics world it needs to work seamlessly and that includes over the air updates for devices. Here was the process for updating this device.
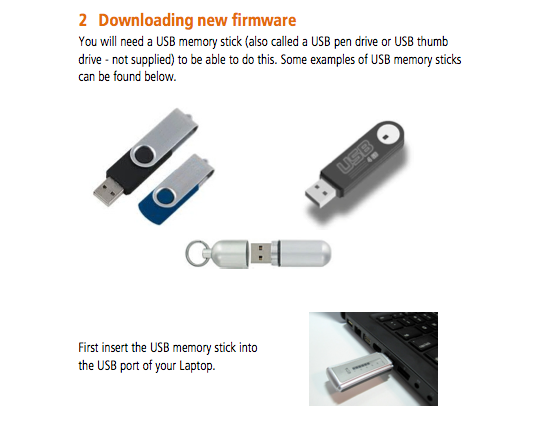
You needed to download the new firmware to your computer and loaded onto a thumb drive. Don’t have a thumb drive lying around? Too bad. You can’t update the system. Now I have about 20 some drives lying around. My father-in-law has none and I’m not quite sure my mother would even know what one is (and she’s one of the smartest people I know). She was resistant to TiVo but now loves it. She’s getting an iPad and I have no doubt she will be a maven within a few days. If I gave her this she would throw it at the wall within a few minutes.
It gets better.
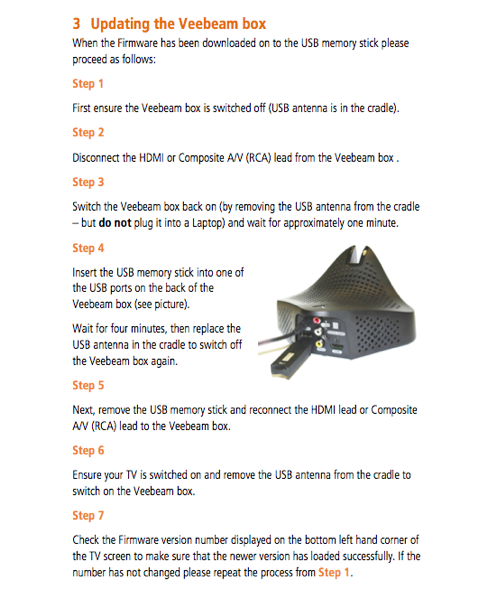
The process of updating the device goes something like this:
Turn off the device but placing the USB dongle into the device itself. Unplug the device from the TV. Remove the dongle from the device and wait 1 min. Plug the USB thumb drive into one of the USB ports on the back. Wait for minutes. Place the USB dongle back into the receptacle on the device so as to turn it off. Remove the USB dongle. Reconnect the cables that connect the device to the TV. Remove the USB dongle from the device. Wait a few minutes. Plug the USB dongle into your computer and keep your fingers crossed.
Yes, it’s straightforward but there’s no way my father-in-law or my mother-in-law with the majority of people I know are going to go through this trouble to get something to work. The other day I was using Thomas’ Nexus S and it prompted me to update the phone. It was a challenging process. I had to plug it into a power source and tell it that I wanted to update the firmware. Then I had to… no, that was it. The firmware was updated within a few minutes. That’s what any device that’s going to hit the mainstream market needs to do. This doesn’t and as such I could never recommend it to my parents and I certainly can’t use it to do what I was hoping I would do–attach one to each of the TVs at my synagogue set we could use the TVs as displays for a variety of laptops. My staff would kill me within a few minutes because of the frustration they would encounter.
And before you ask… NO! I did not call customer service and troubleshoot the issues. That was by choice. The Firmware update process worked fine but there is no way the mainstream market is going to do that. And the device markets itself as plug-and-play for the everyman/woman. If the everyman/woman needs to get on with customer support just to get this working this isn’t a plug-and-play device for the everyman/woman. I know my family members would sooner return it than go through such hoops.
I tried the Veebeam with three different Macs. Maybe it works better with Windows machines, but it is advertised as working with both. As a result, even if it does work better for Windows, I can’t give it my endorsement in its current state.
I was psyched when I first saw word of this device. I was excited to get the review unit. I was totally disappointed with the experience.
So what’s the bottom line?
I like the idea. I like the design. I like the price-point. I think this has HUGE potential. But as it stands now… I hate to say it but I can’t recommend this device to anyone but a tinkerer. If you want something cool to play around with this is great as it stands now. If you want something that is plug-and-play the way this promises to be… Wait for an update or version 2.
The Veebeam is available directly from the manufcturer.
MSRP: Standard Definition- $99, High Definition $139
What I Like: Promises to take any and all video and audio from a computer and stream to a TV; Good pricing; video and audio are mercifully in sync
What Needs Improvement: Getting the VeeBeam desktop to actively launch on the TV screen after a connection was made was hit or miss; the audio was somewhat muddy; the Firmware update process is ridiculous

Its a miracle that you get composite and HDMI. I was afraid that it would only have HDMI, which I don’t have yet. And please do find out what the USB ports are for.
Gear Gadget Review: Veebeam Set-Top Box Lets You Stream Content from Computer to TV #iptv
Gear Gadget Review: Veebeam Set-Top Box Lets You Stream Content …: Those who like industrial design and unusua… http://bit.ly/fHjpbr
Gear Gadget Review: Veebeam Set-Top Box Lets You Stream Content …: Those who like industrial design and unusua… http://bit.ly/fHjpbr
Gear Gadget Review: Veebeam Set-Top Box Lets You Stream Content …: Those who like industrial design and unusua… http://bit.ly/gfLzLP
Gear Gadget Review: Veebeam Set-Top Box Lets You Stream Content from Computer to TV #ipad
Gear Gadget Review: Veebeam Set-Top Box Lets You Stream Content …: Veebeam is the easiest, most affordable way… http://bit.ly/fgNlBv
Gear Gadget Review: Veebeam Set-Top Box Lets You Stream Content … http://bit.ly/dFrNKd